
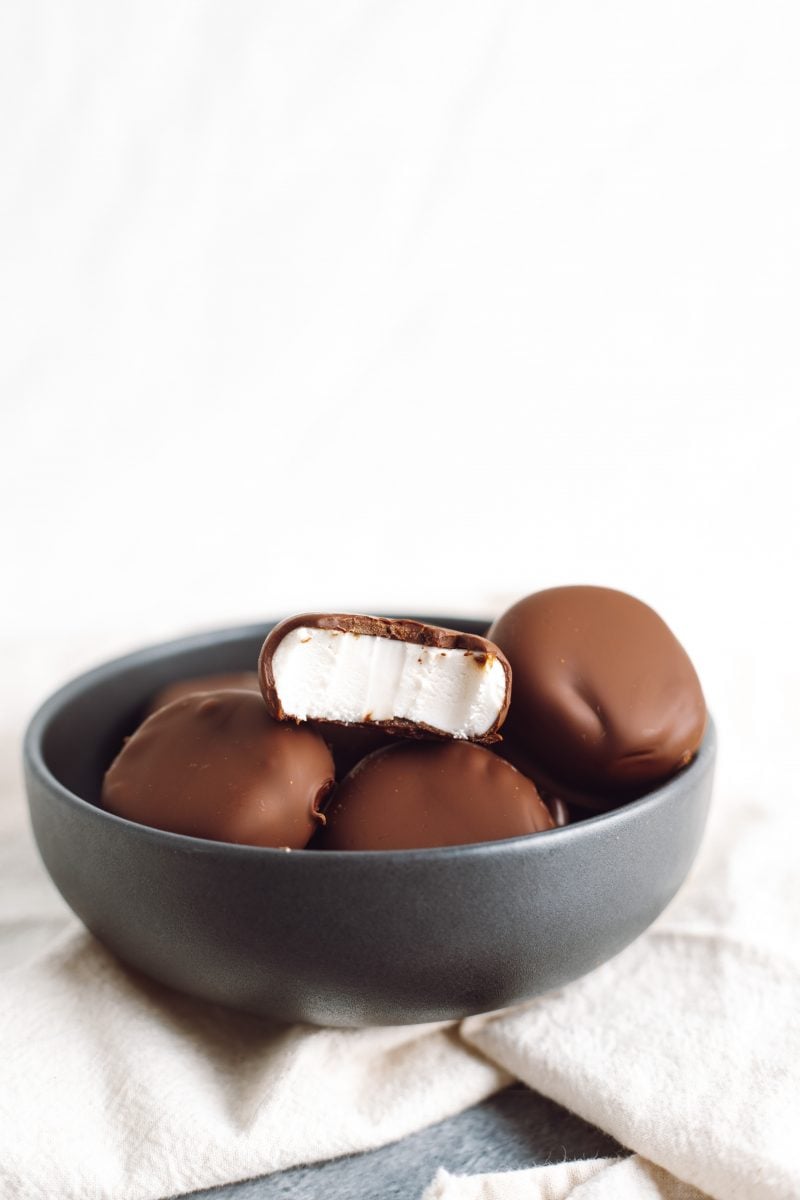
Vegan Vanilla Cream Chocolates are the perfect sweet treat and they’re so easy to make! These little homemade chocolates are smooth and creamy and wrapped in a coating of chocolate that has the perfect *crack* when you bite into them. You would never know they’re completely dairy-free!

I promise these vegan chocolates are not as hard to make as you might think. If you’ve never made chocolates (or chocolates that are vegan), you might be intimidated. But this recipe is super approachable and we’ll break it down for you step by step!
This is a recipe that my mom makes every single year at Christmas (except peppermint instead of vanilla!) and they are a hit with everyone. We used to make them growing up but they weren’t vegan and I searched the internet far and wide for vegan peppermint patty recipes with no success. However, my mom decided to just use her trusty traditional recipe and veganize it, and they turned out great! So today I am sharing the vanilla version with you.
Tip: You can use ANY extract in these to make the flavour you want! We have also done hazelnut, almond, raspberry and lemon. Just make sure to start with a bit less extract and taste the batter as you add more, because some extracts (such as almond or peppermint) can be overpowering versus vanilla which is extremely forgiving.
Why You’ll Love This Vegan Chocolates Recipe
- 5 simple ingredients! You may already have most or all of the ingredients to make these vegan vanilla cream chocolates in your pantry and fridge.
- They make a great gift. Homemade vegan chocolates are an easy gift to make for your sweetie or anyone else in your life.
- Completely customizable. You can change up the flavour easily. In fact, for a really special gift, you could make a few different batches, each with a different flavor. Then mix them up in your gift container for a box of mini chocolate surprises!
Key Ingredients and Substitutions
- Vegan butter: Stick butter like Becel, Earth Island and Melt sticks are the best for this recipe.
- Sweetened condensed coconut milk: The brand I use is Let’s Do Organic. I’ve also seen Nature’s Charm sweetened condensed oat milk which should work. You can also make your own vegan sweetened condensed milk at home!
- Vanilla extract: As mentioned above, you can use any extract for any flavour you like. Just be conservative with the amount as some extracts are much stronger than others. You can always add more after tasting.
- Powdered sugar: In some countries (like the United States), conventional powdered sugar may not be vegan (but organic usually is).
- Dairy-free chocolate for dipping: Enjoy Life is a great brand, but any dairy-free chocolate should work.
How to Make Vegan Vanilla Cream Chocolates
- Prep the pan. Line a baking tray with parchment paper. Set aside.
- Make the filling. In a mixing bowl or the bowl of a stand mixer, use a hand mixer or paddle of a stand mixer to combine the vegan butter, condensed milk and vanilla. Add the powdered sugar about 1 cup at a time, beating to incorporate. If you have added 3 1/2 cups and it is too soft to roll into balls, add another 1/2 cup of powdered sugar. If it is still too soft to roll, refrigerate a few hours until firm enough.
- Form the filling. Roll 2 tablespoons of batter into a ball, then flatten into a disc shape about 1/2 inch thick. Place on the parchment-lined baking tray and repeat with the rest of the dough. You don’t need to leave much space in between the discs, so you should be able to fit them all on the one pan.
- Freeze. Freeze for 1 hour, until frozen.
- A note about tempering the chocolate. This is a quick version of how to temper chocolate in the microwave from this blog post. Read the next section if you want more information on tempering chocolate, or just follow the instructions below for the perfect melted chocolate for dipping:
- Melt chocolate. Put 2/3 of the chocolate in a microwave safe bowl. Melt at 50% power in 1-minute intervals, stirring between each interval, just until melted and smooth.
- Melt the remaining chocolate. Add the remaining 1/3 of the chocolate a few tablespoons at a time, while stirring. Make sure that the pieces are completely melted before adding more.
- Stir. The chocolate will thicken and become cool, shiny, and smooth as you continue stirring and adding small amounts. Once all the chocolate is melted in, you’re ready to dip!
- Dip the vanilla cream discs. Remove the pan from the freezer. Drop a vanilla cream into the chocolate, then use a fork to flip it over and ensure it is coated. Bring it up out of the chocolate, letting the excess drip through the fork, then transfer carefully to the baking tray. It will start to harden and become shiny pretty quickly. Keep dipping all of the chocolate.
- Chill and store. Transfer the dipped chocolates to the fridge to harden completely, then store in an airtight container for up to 2 weeks in the fridge.
How to Temper Chocolate
You know when you pick up a chocolate bar from the store and you can hold onto it for quite a while before it starts to melt in your hands? And it has that nice *snap*? And it can sit at room temperature without going soft? That’s because it is tempered chocolate.
Guys, don’t get intimidated. I avoided teaching myself how to temper chocolate because it seemed soooo confusing with thermometers and double boilers etc. BUT, hear me out.
I found a blog post that has a microwave method for tempering chocolate and it was SO easy. That’s what I did and it worked great! Scroll down to the recipe card and near the bottom of the directions it has the microwave method directions (along with the detailed list of ingredients).
Basically, you melt 2/3 of the chocolate in the microwave on 50% power for a minute at a time, stirring in between until it’s melted. Then, you slowly add the rest of the chocolate, stirring it to melt it in the heat of the already melted chocolate, and this cools the chocolate to the perfect temperature. Then you just start dipping! I swear it was the easiest thing ever and even easier if you have a thermometer you can use to double check its the perfect temperature. I just used a $6 candy thermometer from Bulk Barn.
Ideas for Serving
These vegan chocolates are perfect on their own! They make a great gift for Valentine’s Day, or they’re the perfect vegan candy to enjoy on Halloween. Or any day!
But you could also chop them up and use them as a topping for a bowl of vegan ice cream or vegan milkshake.
Or make them part of a dessert charcuterie board with fresh fruit and other treats, like this edible cookie dough.
How to Store
You can store these vegan chocolates in an airtight container for up to 2 weeks in the fridge.
Or you can place them in a freezer-safe container or bag and keep them in the freezer for up to 3 months. When you want a few, take them out and let them sit at room temperature for an hour or until soft enough to bite. You could also place them in the fridge overnight and they’ll be ready to eat the next day.
Recipe FAQs
Can I use white chocolate?
Sure, it’s actually easy to find vegan white chocolate chips nowadays (Enjoy Life, the brand I mentioned earlier, carries them). I haven’t tested tempering them yet, though, so try it and let me know in a comment below how it turns out!
Can I use coconut oil instead of vegan butter?
I have not personally tried it, but it might work. If you’d like to try using coconut oil instead of vegan butter, use the same amount as indicated in the recipe (1/4 cup).
How to use up leftover melted chocolate?
If you have extra melted chocolate, you can throw some nuts or dried fruit into the bowl and use a fork to toss them around, then transfer to a parchment lined tray and chill until hardened. Store in an airtight container in the fridge (or freeze in a freezer safe container) until ready to eat.
Can you save melted chocolate?
Yes, you can save the leftover melted chocolate! I wouldn’t allow it to harden in the bowl. Use a spatula to scrape the chocolate out onto a tray or plate (depending on the amount of leftover chocolate) and allow it to harden in the fridge or freezer. Then you can peel it off and transfer it to an airtight container or freezer bag. Store in the refrigerator or freezer until ready to use.
Similar Vegan Dessert Recipes to Try Next
Birthday Cake Truffles with Cookie Crumbs
Gooey Flourless Chocolate Chip Banana Pretzel Bars
No Bake Nougat Protein Bites
Chocolate-Dipped Almond Butter Cookies
Chocolate Caramel Crunch Cookie Bars
Cake Pops
Snickerdoodle Cheesecake Cookie Bars
See a video tutorial of how to make these chocolates along with 2 other delicious vegan treats!
Vegan Vanilla Cream Chocolates
- Total Time: approx 2.5 hours (including freezing)
- Yield: approx 35 chocolates
Description
Smooth & velvety vanilla buttercreams dipped in chocolate — completely dairy-free!
Ingredients
Vanilla Cream:
- 1/4 cup vegan butter, room temp
- 150 mL sweetened condensed coconut milk
- 1 tbsp vanilla extract
- 3 1/2 – 4 cups powdered sugar (see directions)
Chocolate:
- 16 ounces (454g) dairy-free chocolate, finely chopped (or if using chocolate chips, no need to chop)
Instructions
- Prep the pan. Line a baking tray with parchment paper. Set aside.
- Make the filling. In a mixing bowl or the bowl of a stand mixer, use a hand mixer or paddle of a stand mixer to combine the vegan butter, condensed milk and vanilla. Add the powdered sugar about 1 cup at a time, beating to incorporate. If you have added 3 1/2 cups and it is too soft to roll into balls, add another 1/2 cup of powdered sugar. If it is still too soft to roll, refrigerate a few hours until firm enough.
- Form the filling. Roll 2 tbsp of batter into a ball, then flatten into a disc shape about 1/2 inch thick. Place on the parchment-lined baking tray and repeat with the rest of the dough. You don’t need to leave much space in between the discs, so you should be able to fit them all on the one pan.
- Freeze. Freeze for 1 hour, until frozen.
- A note about tempering the chocolate. This is a quick version of how to temper chocolate in the microwave from this blog post. Read “How to Temper Chocolate” section in the blog post above if you want more information on tempering chocolate, or just follow the instructions below for the perfect melted chocolate for dipping:
- Melt chocolate. Put 2/3 of the chocolate in a microwave safe bowl. Melt at 50% power in 1-minute intervals, stirring between each interval, just until melted and smooth.
- Melt the remaining chocolate. Add the remaining 1/3 of the chocolate a few tablespoons at a time, while stirring. Make sure that the pieces are completely melted before adding more.
- Stir. The chocolate will thicken and become cool, shiny, and smooth as you continue stirring and adding small amounts. Once all the chocolate is melted in, you’re ready to dip!
- Dip the vanilla cream discs. Remove the pan from the freezer. Drop a vanilla cream into the chocolate, then use a fork to flip it over and ensure it is coated. Bring it up out of the chocolate, letting the excess drip through the fork, then transfer carefully to the baking tray. It will start to harden and become shiny pretty quickly. Keep dipping all of the chocolate.
- Chill and store. Transfer the dipped chocolates to the fridge to harden completely, then store in an airtight container for up to 2 weeks in the fridge.
Notes
- You can use ANY extract in these to make the flavour you want! We have also done hazelnut, almond, raspberry and lemon. Just make sure to start with a bit less extract and taste the batter as you add more, because some extracts (such as almond or peppermint) can be overpowering versus vanilla which is extremely forgiving.
- Prep Time: 20 minutes


These sound great! Do you think adding powdered freeze dried strawberries would change the outcome too much? I’d love make these strawberry flavored.
If I wanted to make the peppermint version would I use the same amount of peppermint extract as vanilla? Thanks!
Peppermint is stronger than vanilla so start with half and taste it to see how much more you want to add :). Always easier to add more than take away!
These look AMAZING! I cannot wait to try this at home.
★★★★★